How to Make a Telegram Pokédex Bot Using Python

For us 90’s kids, pokemon is an area of emotion. I still remember how crazy I was collecting pokemon cards, watching pokemon series on television, and participating in imaginary pokemon fights in school. Thus, I thought of making something related to pokemon. From there the idea of making something like a Pokedex bot came to mind. For those of you who are not familiar with what a Pokedex is, it is a digital tool that holds information related to pokemon. Thinking about which platform to make the bot for I thought Telegram was a great choice. Telegram is now a large community that is only going to grow day by day. So let’s get started making the bot.
Pokédex Database:
The first challenge we have to tackle is how we are gonna get all the information of so many pokemon. Luckily, we got our work made easy for us. Pokemon fans out there built a pokemon API for us which we can use freely. This PokeAPI provides us with a RESTful API that can be used to generate all the pokemon information for our project. To know more about RESTful API you can look into this video.
Wait, there’s more. So the data part is solved, but to make our bot more appealing we are going to add photos of each pokemon. This website does the magic for us. We just have to give the pokemon ID and we get the image of the pokemon in PNG format. Detail will be shown in the coding part.
Integrating PokeAPI:
For integrating PokeAPI we have to learn more about the API. Every good API provides us with documentation. PokeAPI documentation presents us with everything we need to know about this API. Basically, we need to provide an endpoint with a pokemon name/ID when calling the API.
https://pokeapi.co/api/v2/pokemon/{id or name}/
So we have to make a custom python module that we are gonna use in our main bot python program. Let’s name this python file pokedex.py. In our pokedex.py we need two python libraries requests and json imported. Install it in your system using pip.
pip insall requests
The other package json comes prebuilt with python. We will be using the requests library for making the get request for the API call, and the json package we are going to use is for processing the output data that we get from the API call. You see that the output that we get from API response is in JSON format. By using json load method we need to first convert the JSON output into a python dictionary.
output= ""
url = "https://pokeapi.co/api/v2/pokemon/{}/"
#get request for API information retrieval
final_url = url.format(id_name)
response = requests.get(final_url)
response = response.content
#json to python dictionary convertion
information=json.loads(response)
Let’s take a look at a sample JSON response that we get. It will make our work easy to filter out all the information we need.
{
  "id": 12,
  "name": "butterfree",
  "base_experience": 178,
  "height": 11,
  "is_default": true,
  "order": 16,
  "weight": 320,
  "abilities": [
    {
      "is_hidden": true,
      "slot": 3,
      "ability": {
        "name": "tinted-lens",
        "url": "https://pokeapi.co/api/v2/ability/110/"
      }
    }
  ],
  "forms": [
    {
      "name": "butterfree",
      "url": "https://pokeapi.co/api/v2/pokemon-form/12/"
    }
  ],
  "game_indices": [
    {
      "game_index": 12,
      "version": {
        "name": "white-2",
        "url": "https://pokeapi.co/api/v2/version/22/"
      }
    }
  ],
  "held_items": [
    {
      "item": {
        "name": "silver-powder",
        "url": "https://pokeapi.co/api/v2/item/199/"
      },
      "version_details": [
        {
          "rarity": 5,
          "version": {
            "name": "y",
            "url": "https://pokeapi.co/api/v2/version/24/"
          }
        }
      ]
    }
  ],
  "location_area_encounters": "https://pokeapi.co/api/v2/pokemon/12/encounters",
  "moves": [
    {
      "move": {
        "name": "flash",
        "url": "https://pokeapi.co/api/v2/move/148/"
      },
      "version_group_details": [
        {
          "level_learned_at": 0,
          "version_group": {
            "name": "x-y",
            "url": "https://pokeapi.co/api/v2/version-group/15/"
          },
          "move_learn_method": {
            "name": "machine",
            "url": "https://pokeapi.co/api/v2/move-learn-method/4/"
          }
        }
      ]
    }
  ],
  "species": {
    "name": "butterfree",
    "url": "https://pokeapi.co/api/v2/pokemon-species/12/"
  },
  "sprites": {
    "back_female": "http://pokeapi.co/media/sprites/pokemon/back/female/12.png",
    "back_shiny_female": "http://pokeapi.co/media/sprites/pokemon/back/shiny/female/12.png",
    "back_default": "http://pokeapi.co/media/sprites/pokemon/back/12.png",
    "front_female": "http://pokeapi.co/media/sprites/pokemon/female/12.png",
    "front_shiny_female": "http://pokeapi.co/media/sprites/pokemon/shiny/female/12.png",
    "back_shiny": "http://pokeapi.co/media/sprites/pokemon/back/shiny/12.png",
    "front_default": "http://pokeapi.co/media/sprites/pokemon/12.png",
    "front_shiny": "http://pokeapi.co/media/sprites/pokemon/shiny/12.png",
    "other": {
      "dream_world": {},
      "official-artwork": {}
    },
    "versions": {
      "generation-i": {
        "red-blue": {},
        "yellow": {}
      },
      "generation-ii": {
        "crystal": {},
        "gold": {},
        "silver": {}
      },
      "generation-iii": {
        "emerald": {},
        "firered-leafgreen": {},
        "ruby-sapphire": {}
      },
      "generation-iv": {
        "diamond-pearl": {},
        "heartgold-soulsilver": {},
        "platinum": {}
      },
      "generation-v": {
        "black-white": {}
      },
      "generation-vi": {
        "omegaruby-alphasapphire": {},
        "x-y": {}
      },
      "generation-vii": {
        "icons": {},
        "ultra-sun-ultra-moon": {}
      },
      "generation-viii": {
        "icons": {}
      }
    }
  },
  "stats": [
    {
      "base_stat": 70,
      "effort": 0,
      "stat": {
        "name": "speed",
        "url": "https://pokeapi.co/api/v2/stat/6/"
      }
    }
  ],
  "types": [
    {
      "slot": 2,
      "type": {
        "name": "flying",
        "url": "https://pokeapi.co/api/v2/type/3/"
      }
    }
  ]
}
For our Pokedex bot, we are going to show ID, Name, Height, Weight, Types, and Moves. Therefore, it is convenient to filter out all this information and put them in the output string.
output += f"<b>ID:</b> {str(information['id'])} \n"
output += f"<b>Name:</b> {str(information['name'])}\n"
output += f"<b>Height:</b> {str(information['height'])}\n"
output += f"<b>Weight:</b> {str(information['weight'])}\n"
all_types=information['types']
types = ""
for type_ in all_types:
    types += f"{type_['type']['name']} "output += f"<b>Types:</b> {str(types)} \n"
all_moves=information['moves']moves = ""
#getting 5 moves of the pokemon
if len(all_moves) < 6:
    for i in range(len(all_moves)):
        moves += f"<b>{i+1}:</b> {all_moves[i]['move']['name']} \n"
else:
    for i in range(6):
        moves += f"<b>{i+1}:</b> {all_moves[i]['move']['name']} \n"
output += f"<b>Moves:\n</b> {moves} \n"
By default, the bot is going to show a maximum of 5 moves that is why the first 5 moves are filtered out in case there are more than that. If you are wondering why HTML bold tag is used here that’s because the library that we are going to use in the bot supports HTML parse mode. It will make the text more appealing.
Now all that remains is to display the image of pokemon. It can be conducted with the help of the website mentioned in the database part.
if information['id'] <= 890:
    photo_url = f"https://pokeres.bastionbot.org/images/pokemon/{information['id']}.png"
We are going to show pokemon up to 890 since it’s the limit that the database can provide images.
To tidy things up let’s make a Pokedex function that takes pokemon ID/name as a parameter. The final code of the Pokedex module looks like this.
Main Bot:
Finally, comes the bot part. Now we have to connect to telegram and send out a response when somebody requests data. Telegram provides its own API for this. We are not going to use their API directly but use one very popular package for making telegram bots known as python-telegram-bot. Let’s install this to our system
pip install python-telegram-bot
They provide many functions which make our job easy. I am not going to go through all the cool features they provide, but you can learn more from the documentation.
Creating Bot:
Go to botfather for creating a new bot.

Copy the API token code and make a new python file “config_file.py” and paste the token code into the variable api_key.
api_key = ''
Now, let’s make the main part of the bot. Create a new python file bot.py. Make two functions for the start command and help command. Another function is needed for error handling in case our bot faces any error during running.
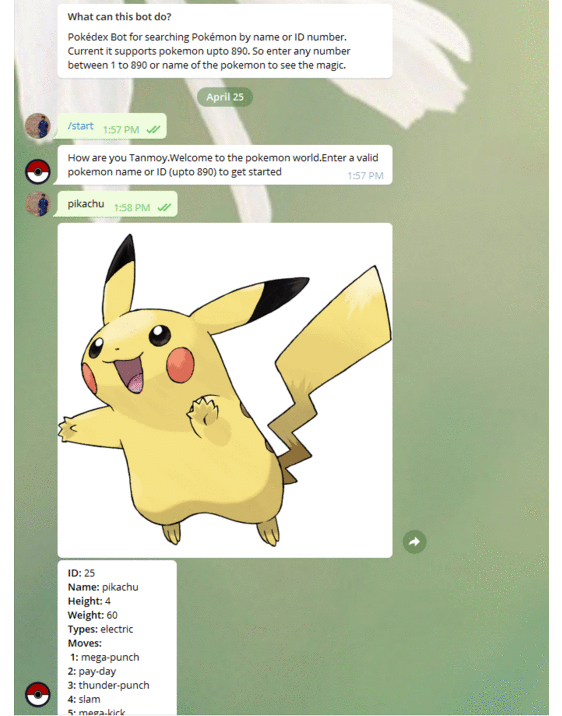
def start_command(update,context):
    username = update.message.chat.first_name
    update.message.reply_text(f"How are you {username}.Welcome to the pokemon world.Enter a valid pokemon name or ID (upto 890) to get started")def error(update,context):
    print(f"{update} caused error {context.error}")def help_command(update,context):

    update.message.reply_text("Please Enter a valid pokemon name or ID (upto 890) to get info")
Start command(/start) prompts the user for a pokemon name/ID and greets them by their first name. These command handlers take two parameters update and context. The reply text method is used for replying to a text sent by the user. To learn more about various methods and functionality go over the documentation.
The next function is going to be used for a response when the user messages the bot.
def message_response(update,context):text = str(update.message.text).lower()
    username = update.message.chat.first_name
    print(username)
    if text in ("hi","hello","yo","whats up"):
        response = (f"<b>How are you doing {username}.Enter a pokemon name or id to get info </b>")
    else:
        response,photo_url = pokedex(text)
        if response != None and photo_url != None:
            chat_id = update.message.chat_id
            context.bot.send_photo(chat_id=chat_id,photo=photo_url)
        else:
            response = "Sorry didn't understand you. Please Enter a <b>valid</b> pokemon name or <b>ID (upto 890)</b> to get info"
Here again, we greet the user if they give a message like “hi”/”hello”. Otherwise, a response with pokemon information along with an image of the pokemon is given according to the name/ID of the pokemon provided by the user. If no valid pokemon name or ID is given we ask the user for entering a valid name or ID.
We have come to our final part that is the main function.
def main():
    updater = Updater(config_file.api_key,use_context = True)
    dp = updater.dispatcher
    dp.add_handler(CommandHandler("start",start_command))
    dp.add_handler(CommandHandler("help",help_command))
    dp.add_handler(MessageHandler(Filters.text,message_response))
    dp.add_error_handler(error)
    updater.start_polling(3)
    updater.idle()
First and foremost, the updater is initialized giving the api_key that we stored earlier. Then the dispatcher is initialized after that. Next in line, we add the two command handlers which will be used for handling /start or /help command in telegram. The message handler is also added for handling any message sent by the user. The last one is the addition of an error handler. Start polling method is called for updating every 3 seconds.
That’s it our bot is completed. Putting all things together final bot.py looks like this.
Just go to the bot.py directory and run the python file. Voilà! The magic starts happening. Go to your bot in telegram, and start sending messages to see the magic.
We got ourselves our own Pokedex bot. For a live demo of this bot visit here. Full code can be found in Github.
Ten articles before and after
How to restart a python program from inside – Telegram Group
How to use the MOONCLONE Bot. To being using MOONCLONE BOT open up… – Telegram Group
First telegram bot in python.. Lets Create our first echo telegram bot… – Telegram Group
Snap-It Find-It: Your Shopping Companion Bot – Telegram Group
? How to create a Telegram Crypto Bot in Javascript – Telegram Group
Telegram Bot integration with Jenkins – Telegram Group
Je vais booster vos abonnés/ventes grâce à une grosse promotion sur Telegram – Telegram Group
PyCryptoBot with Telegram. I received a feature request in the… – Telegram Group