Overengineering at it’s finest

My recent launch into the working world has got start me started thinking more about my finances. Ah yes, finances. The true hallmark of an adult. Up till recently, my approach to spending had always been centered around a ‘budget’. You had X amount of money, therefore, you can only spend that amount. But this has changed ever since work started. Now that I have some disposable income, I suddenly catch myself spending more than I normally would. Can I chalk it up to a lack of self control? Yes, but being able to spend my ‘adult money’ feels great too.
So all of this propelled me into my quest to get my finances in order, as any working adult should, be it to varying degrees. I initially experimented with several existing apps but quickly realized that my aversion to new apps overcame me. Just the thought of having to download another app was already a major obstacle in my mind — in the age of minimalism, why download another app?
So as any self-loving Software Engineer would do, I decided to (over)engineer a simple solution. I spent about a couple of weeks putting together the initial iteration of my expense tracker — a lambda function (AWS) hooked up with a telegram bot and a github-hosted static interface for me to view my expenses.
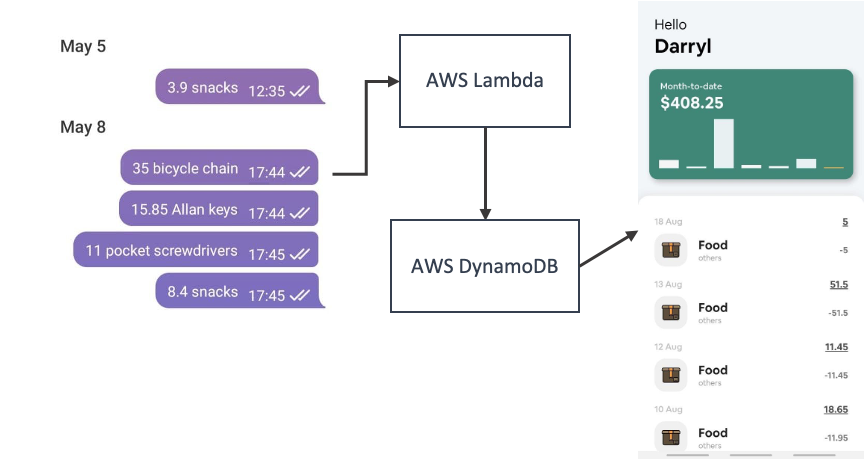
The lambda function would be scheduled to trigger every hour to extract expenses I had keyed into my telegram bot and write this into the database (DynamoDB). And whenever I wished to view a summary or all my expenses, I could simply access the simple mobile interface on my mobile to check.
Having come off the momentum of building this, I started using this religiously (for about 2 months) before I starting to get lazy again. I started missing expense entries and slowly even stopped looking at the expense dashboard I had built. And at the point I realized this, I had already stopped tracking entirely, I decided to have post mortem to review how this happened and concluded the following —
- The Web-app was adding another barrier to the tracking process, something which I was aiming to remove in the first place (but my over engineering self at that time convinced me that it was cool)
- I never ended up checking individual expenses as it didn’t really matter.
- I found difficulty at times classifying my expenses — does all food fall under food? or should they be further categorized under lunch/ snacks/dinner etc. I was classifying them differently depending on my mood at that point in time. This would then affect how the summary looked on the web-app.
- I had to key in recurring expenses each month — for subscriptions (Netflix/Spotify…) and sometimes I would forget them
With these problems in mind, I decided to take another crack at this and give my existing approach a much needed update — yes, there’s no escaping being an adult. And decided on the following revisions —
- Do away with the mobile interface (?)
- Add ‘Request Expense Summary’ feature on the telegram bot for quick access to expenses (send a message summary)
- Define fixed categories to select from when keying in expenses
- Periodic Expense summary feedback (weekly/monthly) via the bot, which also doubles as a reminder to stay on track.
- Support input of recurring expenses (with standard CRD functionality) via the bot
Enter Expendo-bot 2.0
The link to the repository can be found here
This portion is going to be a deeper dive on the implementation/set-up details of the revamped expense bot. Feel free to follow along if you’re interested in setting up your own! It’s going to be broken down into the following sections:
1. Setting up the environment
   -- Tools required
   -- Aws cli set-up (windows)
2. Telegram Bot
   -- Decision Tree (core features)
   -- Starting up the Bot
3. AWS Lambda
   -- Scheduled expense summary
   -- deployment with AWS lambda & AWS Cloudwatch
Setting Up the Environment (Windows)
Before moving on, there are a couple of assumptions I will be making —
- You are an existing Telegram user
- You have a Telegram bot created with Token & Chat ID (@botfather)
- You have an existing AWS Account
- You have NodeJs installed — on whatever machine you’re deploying it on
Tools
- NodeJs
- AWS Cli
- DynamoDB
Set-up
Install — AWS CLI
AWS CLI Configurations
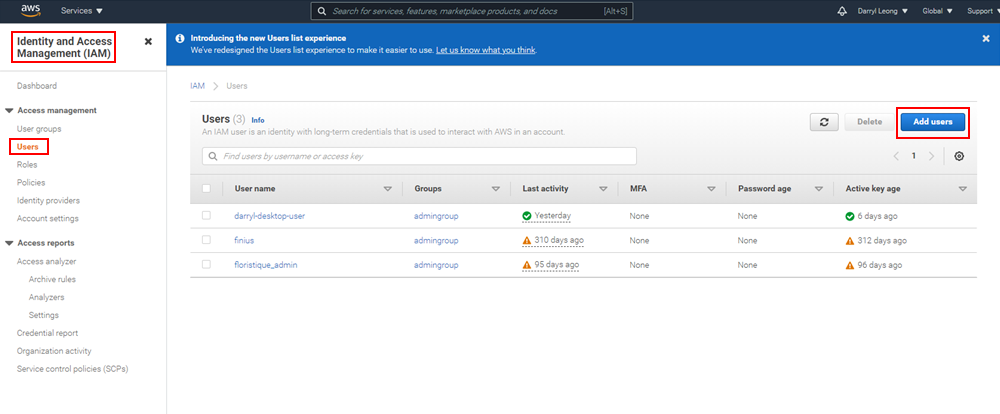
Now that the AWS CLI is installed, we need to ensure that the CLI is configured with the appropriate access rights such that it is able to read & write to the our DynamoDB table. If you already have this set up, you can skip ahead to the next section.
- IAM → Users → Add Users
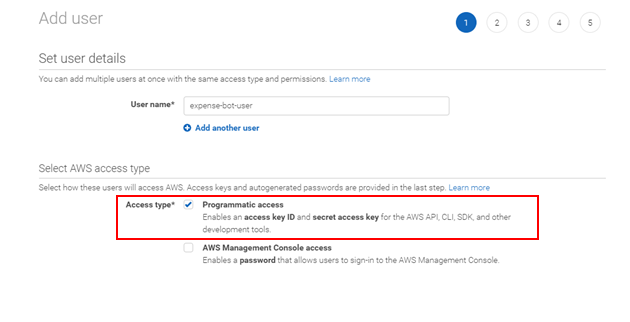
2. Select ‘Programmatic Access’
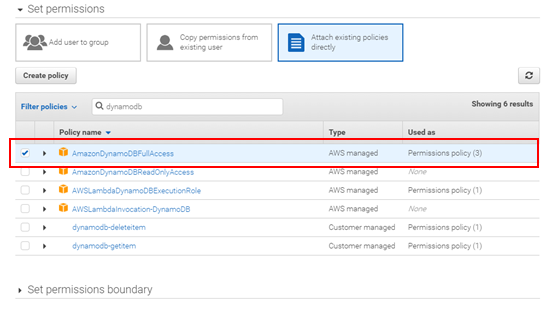
3. Ensure you add the right permissions to the user. This might defer according to your use case. But normally you should adopt a policy of least privilege!
4. Configure your credentials in your terminal/prompt
$ aws configure
AWS Access Key ID [None]: <ACESS_KEY>
AWS Secret Access Key [None]: <SECRET_ACCESS_KEY>
Default region name [None]: <REGION>
Default output format [None]: json
Telegram Bot
Decision Tree
Settling on the core features was a little tough. After overcoming my overengineering side, I finally settled on 5 core features:
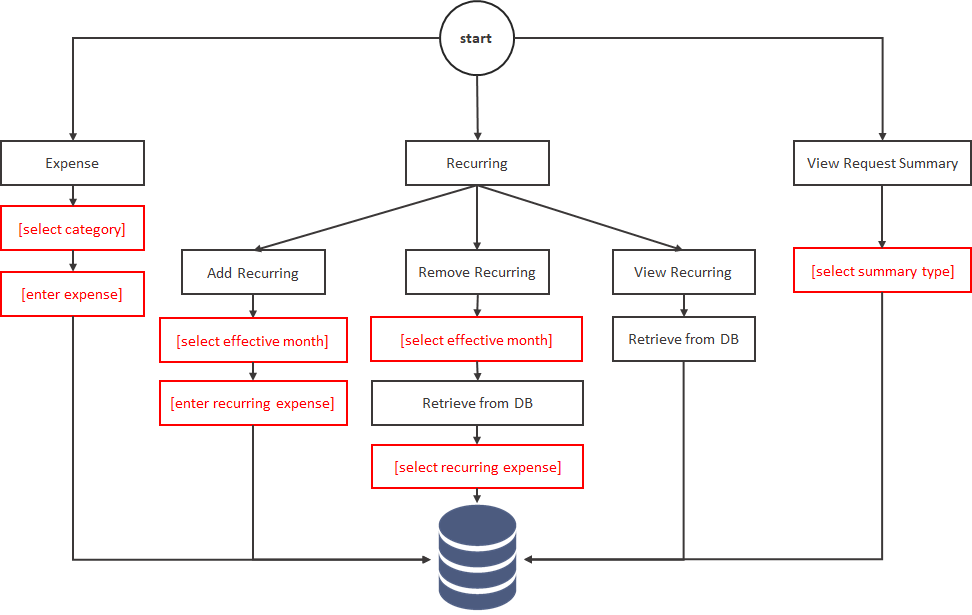
Demos
- Creating an Expense
- Creating a Recurring payment
- Removing a Recurring payment
- Viewing all Recurring payments
- Viewing Expense Summary
Starting up the Bot
- Clone the repository
- run ‘npm install’ in the ‘bot/’ directory
- create a ‘.env’ file:
**TOKEN**=<INSERT TOKEN HERE>
**TABLE_NAME**=<INSERT TABLE NAME>
- run ‘node bot.js’ → On start up, the node server will create a new DynamoDB table based on the given value of TABLE_NAME.
Your very own expense bot should be up and running. Just head on over to your telegram bot to get started! If you’re interested in deploying this bot into a virtual environment so that you can keep it running 24/7, check out my other article here.
AWS Lambda
Now that we have our Telegram bot up and running, it’s time to set up our scheduled functions which will provide us weekly summary reports!
Implementation logic
The rough implementation logic of our lambda function is as follows :
[on trigger]
-> retrieve expenses from previous week
-> aggregate expenses based on categories
-> build response message
-> send summary to user
The implementation code can be found here. I’ve added in an additional feature within the report to reflect the change in expenditure for each category compared to the previous week (thought this would be a cool additional feature).
Deployment with AWS Lambda & AWS CloudWatch
- Create a new Lambda function
- Ensure Lambda has relevant permissions (DynamoDB read access)
- Create ‘.env’ file in ‘weekly summary’ folder:
TOKEN=<INSERT TOKEN HERE>
TABLE_NAME=<INSERT TABLE NAME>
CHAT_ID=<INSERT CHAT ID>
4. Zip all files (including node_modules)
5. Upload .zip file
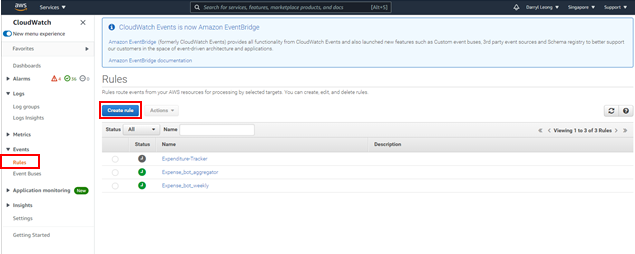
6. Navigate to CloudWatch → Rules→ Create new Rule
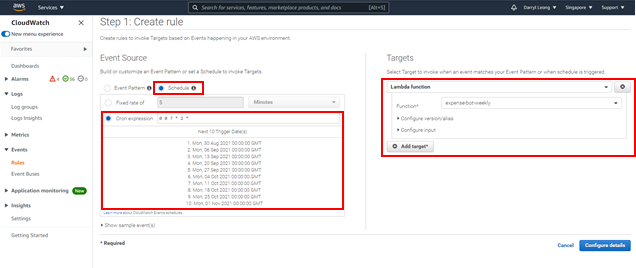
7. Configure cron expression & select targeted lambda function to be triggered
Ten articles before and after
¡La adaptación masiva de las finanzas descentralizadas ya ha ocurrido! – Telegram Group
Call Me with Home Assistant, Zoom and Telegram Bot – Telegram Group
Домашняя бухгалтерия в telegram. Категории и лимиты. – Telegram Group
data-rh=”true”>Connect Your Telegram to Boto – Boto – Telegram Group
CryptoBot en Telegram con Python. Creación de un Bot de Telegram con… – Telegram Group
Домашняя бухгалтерия в telegram. Отложенные счета. – Telegram Group
data-rh=”true”>新手指南(3)—玩 Airdrop (空投)事前準備,15分鐘搞掂開始賺幣 – KK教玩幣 – Medium – Telegram Group